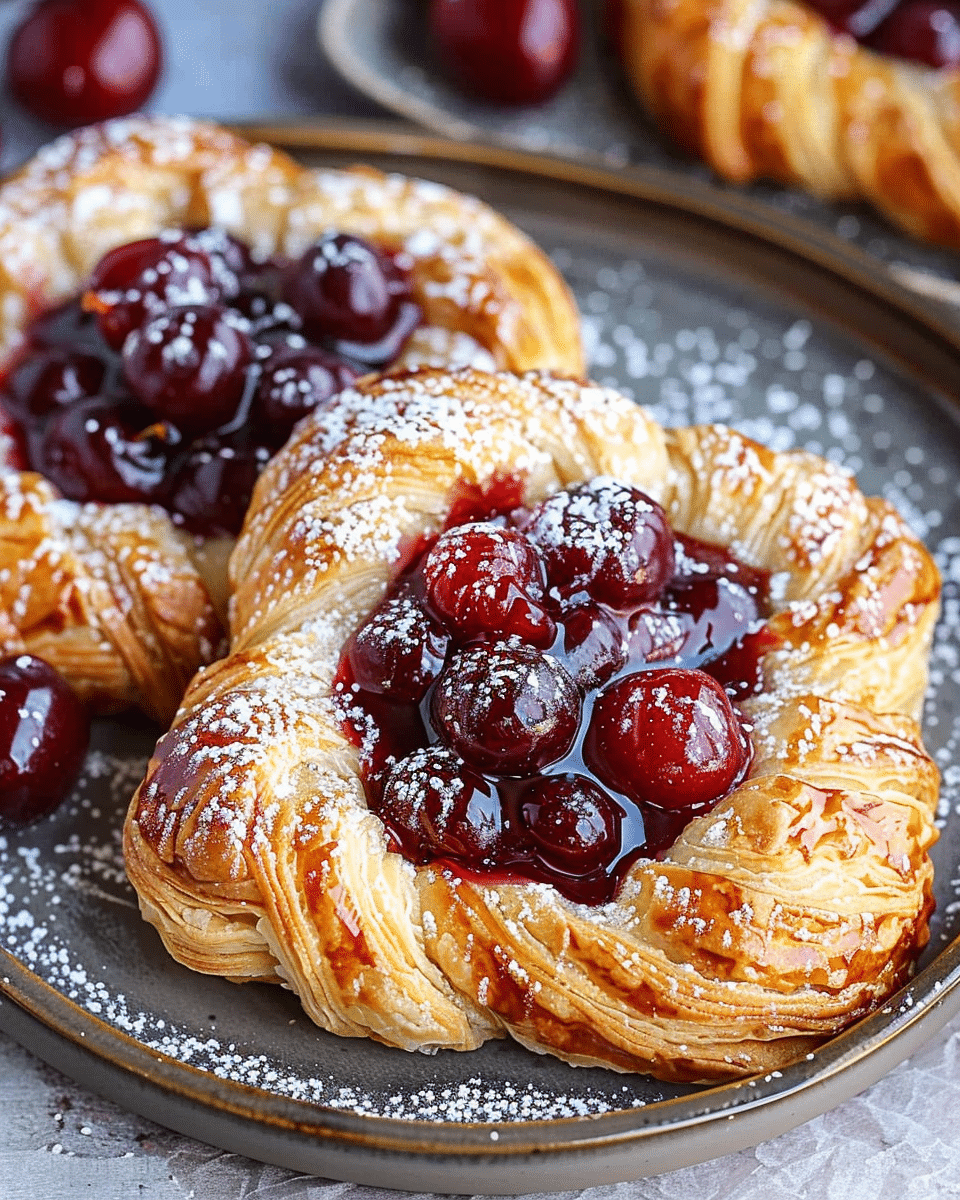
Indulge in the delightful layers of flaky dough and sweet cherry filling with this Cherry Danish Pastry recipe. Made with a homemade buttery dough and a rich cherry filling, these pastries are the perfect combination of texture and flavor. Whether for breakfast, dessert, or a special occasion, these Danish pastries are sure to impress with their elegance and irresistible taste.

Why You’ll Love This Recipe
-
Flaky and Buttery: The homemade dough is perfectly flaky and buttery, providing a melt-in-your-mouth experience.
-
Sweet and Tangy Cherry Filling: The cherry filling adds the perfect sweet and tart contrast, making each bite heavenly.
-
Visually Stunning: These pastries are as beautiful as they are delicious, perfect for impressing guests or bringing to a special occasion.
-
Make-Ahead Option: You can make the dough ahead of time and even freeze the pastries before baking, making them perfect for meal prep.
Ingredients
-
2 cups all-purpose flour
-
½ teaspoon salt
-
1 tablespoon granulated sugar
-
½ cup unsalted butter, cold and cubed
-
¼ cup ice water
-
1 cup cherry pie filling (store-bought or homemade)
-
1 egg, beaten (for egg wash)
-
1 tablespoon milk (for egg wash)
-
Powdered sugar (for dusting)
(Tip: You’ll find the full list of ingredients and measurements in the recipe card below.)
Directions
Make the Dough:
-
Mix Dry Ingredients: In a large mixing bowl, combine the flour, salt, and sugar. Whisk to combine.
-
Add Butter: Add the cold, cubed butter to the flour mixture. Use a pastry cutter or your fingers to work the butter into the flour until the mixture resembles coarse crumbs with small pea-sized pieces of butter.
-
Add Water: Gradually add the ice water, one tablespoon at a time, mixing gently with a fork until the dough begins to come together. Add just enough water until the dough holds together but isn’t sticky.
-
Chill the Dough: Turn the dough out onto a lightly floured surface and shape it into a disk. Wrap it in plastic wrap and refrigerate for at least 30 minutes.
Roll and Fold the Dough:
-
Roll the Dough: After 30 minutes, remove the dough from the refrigerator. On a lightly floured surface, roll it out into a rectangle about ¼ inch thick.
-
Fold the Dough: Fold the dough into thirds, like a letter. Wrap it in plastic wrap and refrigerate for another 30 minutes.
-
Repeat the Process: Repeat the rolling and folding process two more times. After the final fold, wrap the dough tightly and refrigerate for at least 1 hour, or overnight.
Prepare the Cherry Filling:
-
Make Homemade Cherry Filling (optional): If making your own filling, pit and halve about 2 cups of fresh cherries (or use thawed, drained frozen cherries). In a medium saucepan, combine the cherries, ¼ cup sugar, 1 tablespoon cornstarch, and 1 tablespoon lemon juice. Stir gently to combine.
-
Cook the Filling: Cook over medium heat for about 5-7 minutes, stirring occasionally, until the cherries release their juices and the mixture thickens. Remove from heat and let it cool completely.
Assemble the Danish Pastries:
-
Preheat the Oven: Preheat your oven to 400°F (200°C) and line a baking sheet with parchment paper.
-
Roll the Dough: Roll the chilled dough out again into a large rectangle, about ¼ inch thick.
-
Cut the Dough: Cut the dough into squares, about 4×4 inches each, or into triangles if preferred.
-
Make Diagonal Cuts: Make diagonal cuts from each corner of the squares towards the center, about 1 inch in, being careful not to cut all the way through.
-
Add the Filling: Place a spoonful of the cherry filling in the center of each square.
-
Fold the Dough: Fold the corners of the dough over the filling, overlapping them slightly.
-
Brush with Egg Wash: In a small bowl, mix the beaten egg with milk. Brush the tops of the pastries with the egg wash for a golden finish.
Bake the Pastries:
-
Bake: Place the pastries in the preheated oven and bake for 15-20 minutes, or until golden brown.
-
Cool and Dust: Allow the pastries to cool slightly before dusting with powdered sugar.
Servings and Timing
-
Servings: 8 pastries
-
Prep Time: 20 minutes
-
Cook Time: 15-20 minutes
-
Total Time: 110 minutes (including chilling and resting time)
Variations
-
Richer Flavor: Add a splash of almond extract to the cherry filling for a richer, more complex flavor.
-
Other Fruit Fillings: Swap out the cherry filling for raspberry, blueberry, or peach for a different flavor profile.
-
Add Icing: Drizzle a light glaze or icing over the cooled Danish for added sweetness.
Storage/Reheating
-
Room Temperature: Store leftover pastries in an airtight container at room temperature for up to 2 days.
-
Refrigerator: Refrigerate leftover pastries for up to 4 days. Reheat in the oven at 350°F for about 5 minutes to restore crispiness.
-
Freezing: These pastries can be frozen before baking. Just freeze them on a baking sheet, then transfer to a freezer bag. Bake from frozen, adding a few extra minutes to the baking time.
FAQs
Can I make the dough ahead of time?
Yes, the dough can be made ahead of time and refrigerated for up to 1-2 days. Just let it come to room temperature before rolling it out.
Can I use store-bought puff pastry?
Yes, you can substitute store-bought puff pastry for the homemade dough. Just skip the rolling and folding steps and bake as directed.
How can I make the filling less sweet?
If you prefer a less sweet filling, reduce the amount of sugar in the cherry mixture and add a bit more lemon juice for tartness.
Can I make these pastries mini-sized?
Absolutely! Just cut the dough into smaller squares or triangles and adjust the baking time as needed.
How can I ensure the dough is flaky?
Be sure to use cold butter, and don’t overwork the dough. Chilling between folds helps ensure the dough becomes flaky when baked.
Conclusion
These Cherry Danish Pastries are the perfect combination of flaky, buttery dough and sweet cherry filling. They make a beautiful breakfast treat or dessert, and they’re sure to impress anyone who tastes them. With a bit of time and effort, you can enjoy the classic flavors of a Danish pastry right in your own kitchen!
Print
Cherry Danish Pastry: A Delicious Recipe for a Classic Treat
- Total Time: 1 hour 50 minutes (including chilling time)
- Yield: 8 pastries
Description
This Cherry Danish Pastry is a flaky, buttery delight, filled with sweet cherry filling and dusted with powdered sugar. Made with homemade dough, this recipe brings the classic Danish treat to your kitchen. Perfect for breakfast or dessert, these pastries are a crowd-pleasing treat that’s as beautiful as it is delicious!
Ingredients
For the Dough:
2 cups all-purpose flour
½ teaspoon salt
1 tablespoon granulated sugar
½ cup unsalted butter (cold and cubed)
¼ cup ice water
For the Cherry Filling:
1 cup cherry pie filling (store-bought or homemade)
For the Egg Wash:
1 egg (beaten)
1 tablespoon milk
For Dusting:
Powdered sugar
Instructions
Make the Dough: In a large mixing bowl, combine the flour, salt, and granulated sugar. Whisk until well mixed. Add the cubed butter and use a pastry cutter or your fingers to work the butter into the flour until it resembles coarse crumbs.
Form the Dough: Gradually add ice water, one tablespoon at a time, mixing gently with a fork until the dough comes together. Shape the dough into a disk, wrap it in plastic wrap, and refrigerate for at least 30 minutes.
Roll and Fold the Dough: After 30 minutes, roll the dough into a rectangle (about 1/4 inch thick). Fold the dough into thirds, like a letter. Wrap and refrigerate for another 30 minutes. Repeat the rolling and folding process two more times. After the final fold, refrigerate the dough for at least 1 hour or overnight.
Make the Cherry Filling (if homemade): In a medium saucepan over medium heat, combine cherries, ¼ cup sugar, cornstarch, and lemon juice. Cook for 5-7 minutes, stirring occasionally, until thickened. Remove from heat and let it cool completely.
Prepare the Pastry: Preheat your oven to 400°F (200°C) and line a baking sheet with parchment paper. Roll the dough out into a rectangle (1/4 inch thick), and cut into 4×4 inch squares or triangles. Make diagonal cuts from each corner towards the center (about 1 inch in).
Assemble the Pastries: Place a spoonful of the cherry filling in the center of each square. Fold the corners over the filling, overlapping them slightly. Brush the top with the beaten egg and milk for a golden finish.
Bake: Bake for 15-20 minutes, or until golden brown. Let cool slightly before dusting with powdered sugar.
Notes
“For a richer flavor, add a splash of almond extract to the cherry filling.”
“These pastries can be made ahead of time and frozen before baking. Bake straight from the freezer, adding a few extra minutes to the baking time.”
- Prep Time: 30 minutes (plus refrigeration)
- Cook Time: 15-20 minutes
- Category: Dessert
- Method: Baked
- Cuisine: American


