Description
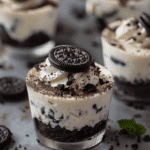
These No-Bake Oreo Cheesecake Cups are a creamy, indulgent, and incredibly easy dessert made with just 5 ingredients! Perfect for summer, these mini cheesecakes are a crowd favorite, combining the sweetness of Oreos with a smooth cheesecake filling. No baking required, just 20 minutes of prep, and you’re ready to enjoy this simple yet delicious treat. Gluten-free and easily customizable with your favorite Oreo flavor!
Ingredients
8 oz cream cheese (full fat, softened)
1 cup powdered sugar
1 tsp vanilla extract
1 ½ cups Cool Whip (or homemade whipped cream)
15 Oreos (crushed, plus extra for garnish)
Instructions
Prepare Oreo Crust:
Place Oreos in a plastic bag and crush them using a rolling pin or sturdy spoon. You want them to be in larger pieces, not crumbs.
Spoon about 1 ½ to 2 tablespoons of crushed Oreos into the bottom of 6 dessert cups (or small jars). You can also use a larger dish and make it like a parfait.
Make the Cheesecake Filling:
In a mixing bowl, beat together cream cheese and powdered sugar until smooth and creamy. Start slowly to avoid powdered sugar splatter, then gradually increase speed.
Add vanilla extract and beat until incorporated.
Gently fold in the Cool Whip until fully combined.
Fold in the remaining crushed Oreos.
Assemble the Cups:
Spoon the Oreo cheesecake filling into the dessert cups, pressing it down gently to fill the gaps around the crushed Oreos.
Chill:
Refrigerate for at least 1 hour (if you can wait!) to allow the filling to set.
Serve:
Top with a dollop of whipped cream, and garnish with mini Oreos or half of a full-size Oreo cookie. You can also add some extra Oreo crumbs on top for decoration.
Notes
Layered Parfait: If you want to make it look even fancier, layer the crushed Oreos and cheesecake mixture in parfait-style jars for a beautiful presentation.
Mini Cheesecakes: For mini cheesecakes, press the Oreo crust into muffin tins and add the cheesecake filling on top. Alternatively, use muffin liners for easy removal.
Oreo Flavor Variations: You can use any type of Oreo—mint, peanut butter, or even holiday-themed Oreos—for different flavor variations.
Mint Oreo Twist: Add ½ tsp of peppermint extract and use mint Oreos to create a minty cookies and cream version.
How to Make This in One Dish:
If you prefer a single large cheesecake, you can use an 8×8-inch square pan or any small baking dish. Add a thicker Oreo crust and layer the cheesecake filling for easier serving. However, keep in mind this version might be a bit messier when serving compared to individual cups.
Storage:
These Oreo Cheesecake Cups can be stored in the refrigerator for up to 5 days if covered tightly or placed in an airtight container. If your cups don’t have lids, you can cover them with plastic wrap and foil.
Freezing: You can freeze this dessert as well. Make sure it is tightly wrapped and covered. To enjoy, thaw in the fridge overnight.
Why You’ll Love This No-Bake Oreo Cheesecake:
Simple & Quick: Just 5 ingredients and 20 minutes of prep time.
No Oven Required: The perfect summer dessert without turning on the oven.
Individual Servings: Ready-to-serve mini cheesecakes with no cutting or scooping needed.
Customizable: Use any Oreo flavor you like, and create your own twist on this classic treat.
- Prep Time: 15 minutes
- Chill: 30 minutes
- Cook Time: 45 minutes

